


Introduction
 By positioning your strobes differently it's possible to minimize this effect.
Nikon RAW/NEF still from Nikon D80. F/13, 1/80, ISO200, Zeelandbrug high tide
Step 1 - Crop and basic composition
Crop or delete any unwanted parts of the photo for creative or dramatic effect. This will also ascertain you’ll be editing the most wanted part of the original photo. It’s also easy to work on the best part of the image and work on contrast, noisereduction, colorrendition and saturation after the first edits.
When opening the RAW file, this is also the moment to select the best settings in Adobe’s RAW converter. In a different tutorial I’ll discuss the options and possibilities of the RAW converter.
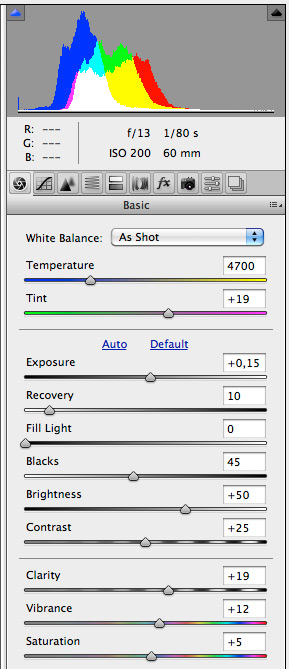
RAW settings for this particular file. You can see it’s underexposed.
Step 2 - Dust and scratches… filter
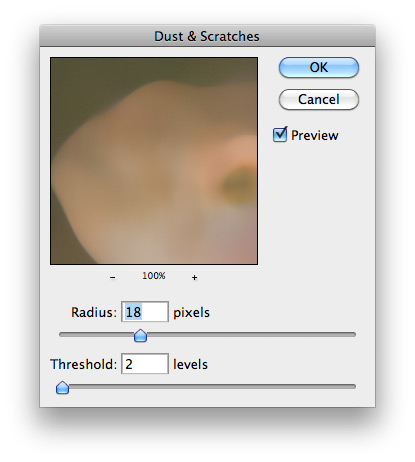
Choose the menu Filter, and then Noise and finally Dust and scratches…

Choose high values for Radius and a small Threshold. Radius: 18 pixels en Threshold: 2 levels for instance.
In the preview you’ll see the whole photo go fuzzy. Don’t worry about that. Your dust and scratches in the photo will also have disappeared. Apply the filter.
Step 3 - Mark the layer, that will function as the start for the History brush
Open the History window from the Window menu. You’l see any previous taken steps during editing. Check the empty square in front of the Dust and scratches filteraction. This will mark that layer as origin for the History brush.

The icon of the History brush looks the same as in the tools palette. A brush with a backwards pointing arrow.
Now click and activate the previous step in the History palette. Your image will revert back to normal, but the History brush is checked.
Step 4 - using the History brush
The final step is to actually use the History brush. The History brush [Y] has this icon.
From the tool options choose Mode: Darken. Select a brushsize - small for small specks of dust and large for larger areas - and start painting the results of the Dust and scratches… filter on. You’ll see the white spots darken up and disappear. The hardness of the brush can be set in percentages (1 to 9 keys for quick % selections) to apply the effect in 10 to 100% percent increments. Watch out not to brush on the subjects or parts of the photo, where you want detail to be preserved. The History brush will also paint over parts of your subject with sloppy brushclicking.

Finally a quick curvemodification will bring back more contrast and color to the photo. I’ve used a quick S-curve, but you can spend any amount of time on more meticulous settings.

Conclusion
This simple technique combined with the Spot Healing brush [J] can quickly edit out ugly whitish specks from a photo to clean it up.
The endresult can also be found on Flickr.
http://www.flickr.com/photos/arne/4927858588/in/photostream/
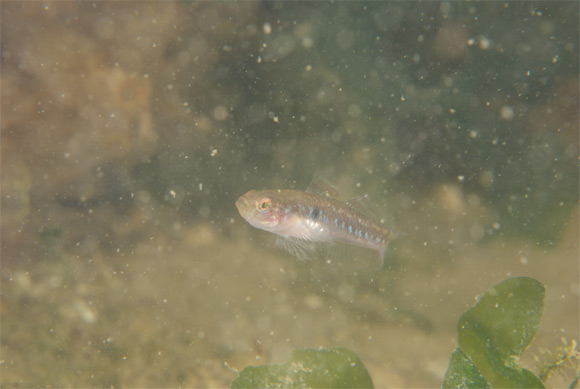
When shooting underwater photos the light from your strobes will reflect off particles in the water.
It’s also useful to use software techniques to minimize particles in the endresult of your photoediting.
For editing I use Adobe Photoshop CS 5, but this technique also works in the much more affordable Adobe Photoshop Elements.
With square brackets [ ] I’ll denote the quickkey for a certain function.
Technique
In 4 simple steps most of the particles on a photo can be removed to taste.
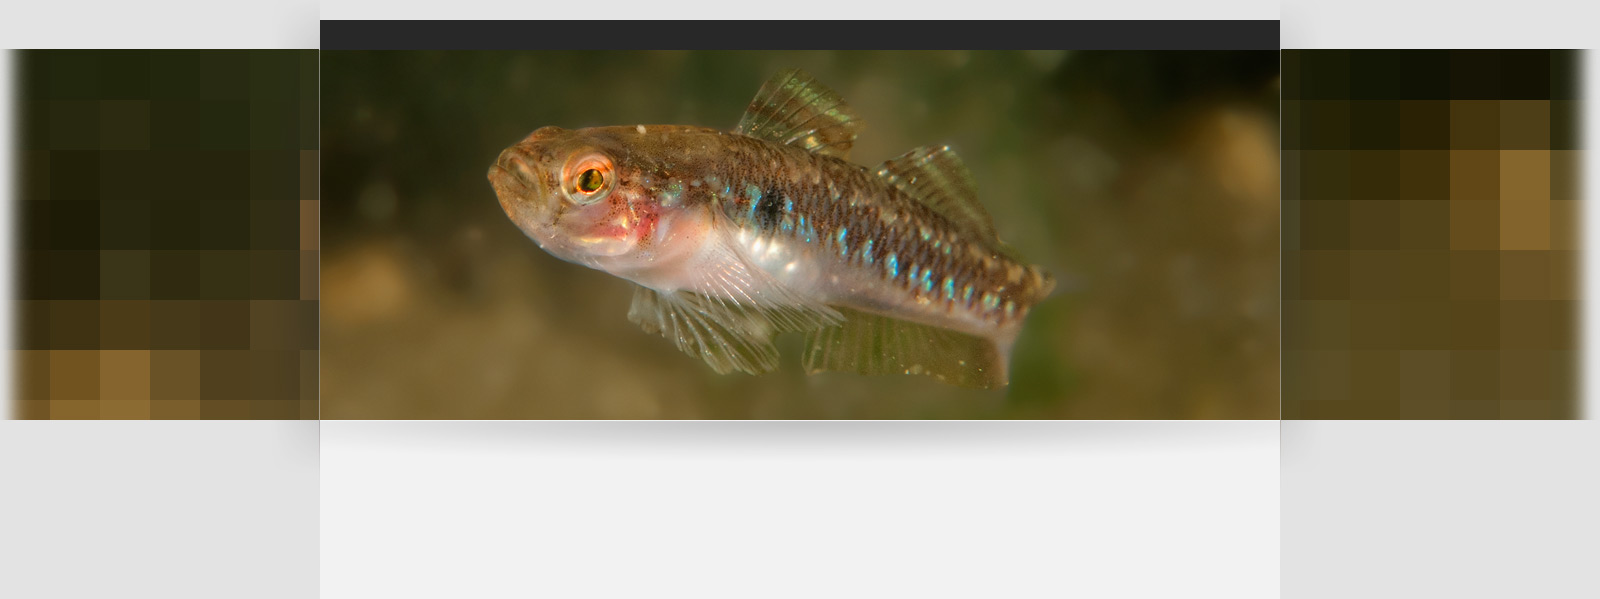
In this tutorial I’ll use a photo of a freeswimming goby that I recently took.
As you can see it has a severe case of backscatter due to floating particles and the distance of the subject from the lens.
Nikon RAW/NEF still from Nikon D80. F/13, 1/80, ISO200, Zeelandbrug high tide
Step 1 - Crop and basic composition
Crop or delete any unwanted parts of the photo for creative or dramatic effect. This will also ascertain you’ll be editing the most wanted part of the original photo. It’s also easy to work on the best part of the image and work on contrast, noisereduction, colorrendition and saturation after the first edits.
When opening the RAW file, this is also the moment to select the best settings in Adobe’s RAW converter. In a different tutorial I’ll discuss the options and possibilities of the RAW converter.
RAW settings for this particular file. You can see it’s underexposed.
Step 2 - Dust and scratches… filter
Choose the menu Filter, and then Noise and finally Dust and scratches…
Choose high values for Radius and a small Threshold. Radius: 18 pixels en Threshold: 2 levels for instance.
In the preview you’ll see the whole photo go fuzzy. Don’t worry about that. Your dust and scratches in the photo will also have disappeared. Apply the filter.
Step 3 - Mark the layer, that will function as the start for the History brush
Open the History window from the Window menu. You’l see any previous taken steps during editing. Check the empty square in front of the Dust and scratches filteraction. This will mark that layer as origin for the History brush.
The icon of the History brush looks the same as in the tools palette. A brush with a backwards pointing arrow.
Now click and activate the previous step in the History palette. Your image will revert back to normal, but the History brush is checked.
Step 4 - using the History brush
The final step is to actually use the History brush. The History brush [Y]
From the tool options choose Mode: Darken. Select a brushsize - small for small specks of dust and large for larger areas - and start painting the results of the Dust and scratches… filter on. You’ll see the white spots darken up and disappear. The hardness of the brush can be set in percentages (1 to 9 keys for quick % selections) to apply the effect in 10 to 100% percent increments. Watch out not to brush on the subjects or parts of the photo, where you want detail to be preserved. The History brush will also paint over parts of your subject with sloppy brushclicking.
Finally a quick curvemodification will bring back more contrast and color to the photo. I’ve used a quick S-curve, but you can spend any amount of time on more meticulous settings.
Conclusion
This simple technique combined with the Spot Healing brush [J] can quickly edit out ugly whitish specks from a photo to clean it up.
The endresult can also be found on Flickr.
http://www.flickr.com/photos/arne/4927858588/in/photostream/